Sound Effect Editor
The function of each field in the Sound Effect Editor window will be described in the following section.
You can find the Sound Effect Editor window under "Window > RetroKit > Sound Effect Editor".
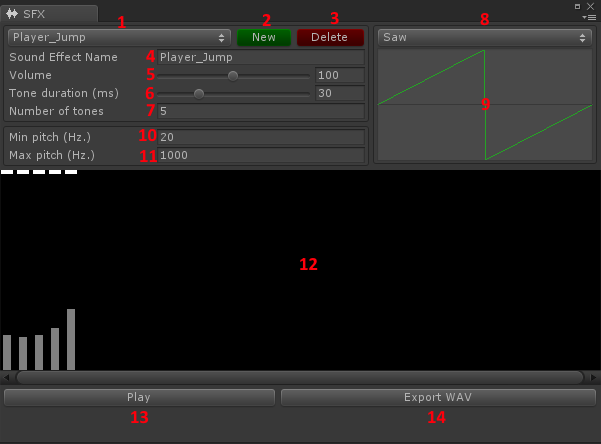
- The sound effect selector.
- Create a new sound effect.
- Delete the selected sound effect.
- Rename the selected sound effect.
- Change the master volume of the selected sound effect.
- Change the duration of each tone of the selected sound effect.
- Increase/decrease the number of tones that the selected sound effect consists of.
- The Sample Provider used to create samples for this sound effect. This determines what the sound effect sounds like or what "instrument" is used.
- If the selected sample provider is a Curve Sample Provider, a visual representation of the curve is displayed here.
- The minimum pitch that's selectable for each tone in the Sound Effect Composer (12).
- The maximum pitch that's selectable for each tone in the Sound Effect Composer (12).
- The Sound Effect Composer.
- Play the selected sound effect.
- Export the selected sound effect to a .wav file.
Sound Effect Composer Controls
Click (or drag) on, or on the space above, the bar that represent the tone, to change the pitch and volume for that tone. The pitches are represented by the gray bars and the volumes by the white ones.
| Action | Controls |
|---|---|
| Adjust pitch | Left-click (or drag) on or above the gray bars |
| Adjust volume | Right-click / Alt + Left-click (or drag) on or about the gray bars) |