Sprite Editor
The function and controls of each window and its fields will be explained in the following sections.
You can find the Sprite Editor window under "Window > RetroKit > Sprite Editor".
Top bar
The top bar contains buttons to open/close windows and turn grid lines on/off.

- Open/close "Sprite Properties" window.
- Open/close "Animations" window.
- Open/close "Animation Sets" window.
- Show/hide grid lines.
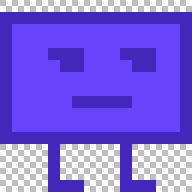
Sprite Properties
![]()
Sprite selector.
Create a new sprite.
Delete the selected sprite.
Duplicate the selected sprite.
Rename the sprite.
Change the width of the selected sprite.
When width is increased, new pixels will be added on the right side of the sprite.
When width is decreased, pixels will be removed from the right side of the sprite.
Change the height of the selected sprite.
When height is increased, new pixels will be added on the bottom side of the sprite.
When height is decreased, pixels will be removed from the bottom side of the sprite.
Canvas
The canvas displays the selected sprite and allows to apply the selected tool on it by clicking on its pixels.
Controls
| Action | Control |
|---|---|
| Canvas Zoom In | Scrollwheel Up / Plus |
| Canvas Zoom Out | Scrollwheel Down / Minus |
| Drag Canvas | Middle Mouse Button / Ctrl + Left Mouse Button |
| Selected Tool Primary Action | Left Mouse Button |
| Selected Tool Secondary Action | Right Mouse Button / Alt + Left Mouse Button |
Palette
The "Palette" window shows the colors available for this project (these are defined in the Retro System selected for this project) and allows the selection of the primary and secondary colors to draw on the canvas with.

Shows the selected primary color.
Shows the selected secondary color.
Shows all the available colors.
Left-clicking a color will set it as the primary color.
Right-clicking or Alt + Left-clicking a color will set it as the secondary color.
Double clicking a color, opens a color picker to change the color. Please note that changing the color will change it for the selected Retro System and therefore for the entire project and the RetroKit sprites in it!
Adds a new color to the palette. LMB to use the primary color for the new color and RMB to use the secondary color.
Toolbox
The "Toolbox" window contains the set of tools that can be used to draw the sprite on canvas.
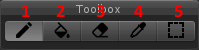
1. Pencil
The pencil tool can be used to click (and drag) on a pixel to give it a different color. Left-click to use the primary color. Right-click to use the secondary color.
2. Fill
The fill tool allows to change the color of connected pixels of the same color. Left-click will to use the primary color. Right-click to use the secondary color.
3. Eraser
The eraser tool clears a pixel of any color. Left-click (and drag) clears a single pixel of their color. Right-click will remove the color from a pixel and connected pixels of the same color, similar to the fill tool.
4. Color picker
The color picker is used to select a color from a pixel and make it the primary or secondary color. Left-click to change the primary color. Right click to change the secondary color.
5. Select/Move tool
Click and drag to select a part of selected sprite. Click and drag the selected part to move it. If you hold D, the part is duplicated instead of moved.
Early development
More tools will be coming in future releases.
Animations
The "Animations" window is used to create animations out of created sprites.

Animation selector.
Create a new animation.
Delete the selected animation.
Rename the selected animation.
Change the speed of the animation in frames per second.
The frame viewer and selector.
It shows all the frames in the animation. The frame with the red border is the one that is currently selected. Left-clicking a frame will select it as the active frame as well as the active sprite in the "Sprite Properties" window and "Canvas".
Move the selected frame one to the left.
Move the selected frame one to the right.
Remove the selected frame.
Add the sprite that's selected in the "Sprite Properties" window to the animation.
Add sprites selected in the project window as frames to the selected animation.
Opens/Closes a window that shows a preview of the selected animation.
Animation Sets
The "Animation Sets" window allows for the grouping of animations.
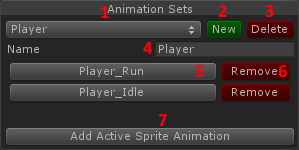
Animation set selector.
Create a new animation set.
Delete the selected animation set.
Rename the selected animation set.
Foreach animation in the selected animation set:
Displays the animation's name and clicking it will select it in the "Animation" window.
Removes the animation from the animation set.
Adds the animation selected in the "Animation" window.